| Insert excerpt | ||||||||
|---|---|---|---|---|---|---|---|---|
|
| Tip |
|---|
You can add, change, append values of Smart Checklist content |
...
using Jira Misc Workflow Extensions (JMWE) add-on⚡️ |
| Info |
|---|
...
is powerful, all-in-one Jira automation app to customize and expand your workflows. Smart Checklist can be tightly integrated and expanded with JMWE tools |
...
| Note |
|---|
This instruction applies to Jira Cloud instances. For Jira Server please check Jira Misc Workflow Extensions (JMWE) - Server |
Set issue, user or project Entity Property value (JMWE add-on)
Below you can see few use cases which could be implemented using JMWE tools.
Use Cases
Read more here → https://innovalog.atlassian.net/wiki/spaces/JMWEC/overview |
| Info |
|---|
RequiresChecklists Custom Field→ "Checklists" Custom Field set up |
| Panel | ||
|---|---|---|
| ||
☝🏼 NOTE: Not available in Next-Gen projects. Workflow customization isn't available yet for Next-Gen projects. As of now, it is on the longer-term roadmap of the Atlassian team. Therefore, transition validators are not available either. |
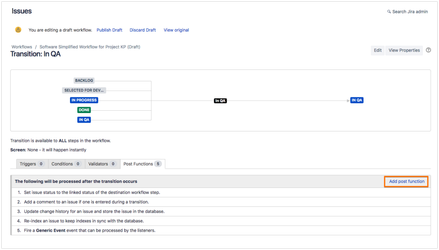
Use Case: Append Smart Checklist items while transitioning Jira issue
Append Smart Checklist items while transitioning Jira issue
...

...
...
Go to Project Settings → Workflows
Choose the Workflow you want to add a post function to and click Edit:
...
Add a Post Function
3.1. Choose transition and click on the Post Functions link:
...
3.2. Add Post Function:
...
3.3. Choose Set Entity Property value (JMWE add-on)
...
and click Add:
...
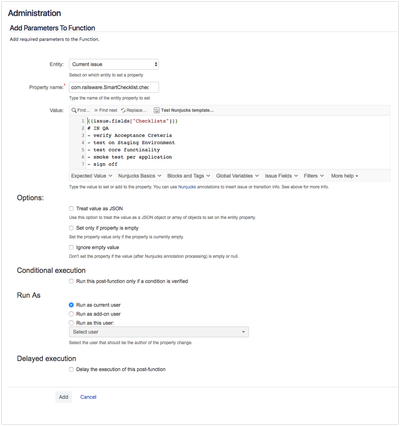
3.4. Add parameters to Function:
Property Name |
|
...
Value |
|
If you want to |
...
replace the checklist with the Checklist Items - just add Checklist items in Markdown formatting 👉🏻 |
| ||
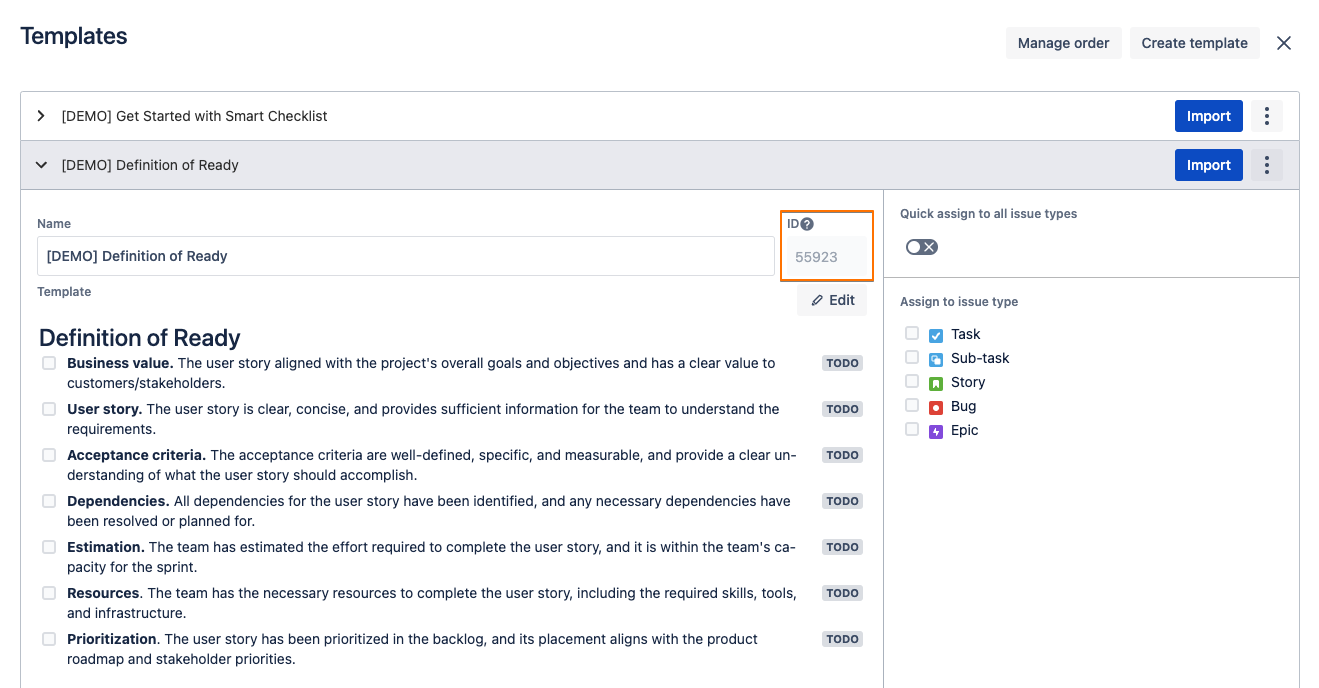
If you want to replace the checklist with the Checklist Template - add the following script and specify the Template Id instead of |
|
...
| Note |
|---|
Make sure you have a "Checklists" custom field added as a Smart Checklist storage. Read Administrator Instructions for set up Otherwise - only new items will be added to the "Smart Checklist" content. |
| Warning |
|---|
Not available in next-gen projects. Please see the details here. |
...
...
| ||||||
If you want to append checklist instead of replacing it - just add the following at the beginning 👉🏻 |
|
...
3.5. Save Post Function by clicking Add
Check added post function and Publish Draft
...
...
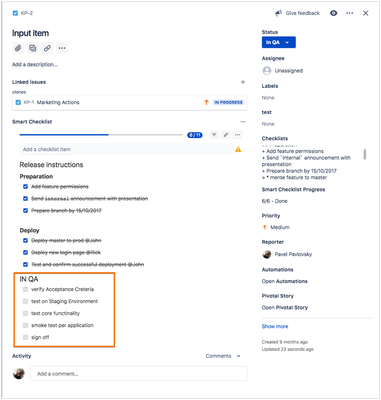
You're done! Now every time the Issue will be transitioned to
| Status | ||||
|---|---|---|---|---|
|
| Insert excerpt | ||||||||
|---|---|---|---|---|---|---|---|---|
|