Example
Manage Statuses
Navigate to Admin Console → Manage Apps → Smart Checklist → Settings → Statuses
[IMAGE]
There are 4 default static statuses available in appropriate states: “To Do” (unchecked), “Skipped” (checked), “In Progress” (unchecked), “Done” (checked).
You can change the status color and order. You can’t change the “State” of default status.
Create a new Custom Status
Below the statuses list enter a new status Name, choose Color, State and click “+ Add”.
[IMAGE]
You can’t rename custom status once it’s added. You’ll need to remove the status and add a new one.
Remove status
To remove custom status - click the “Trash bin” icon near the status state.
Once confirmed - status will be removed from the statuses list and all checklist items will be reassigned to the default statuses based on the following rule:
if the removed status had “Checked” state - checklist items will be set to “Done” status,
if the removed status had “Unchecked” state - checklist items will be set to “To Do” status.
Reorder status
[IMAGE]
Hold the draggable icon and reorder statuses in the way how you’d like them to be represented in checklist UI.
Change status in Smart Checklist UI
[IMAGE]
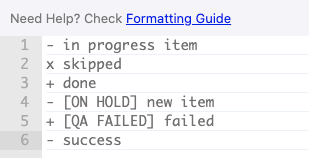
Custom status in RAW text format
Custom statuses are represented as [statusname] following the state sign.
Example
Unchecked ON HOLD item would be accessed in Full-screen editor or “Checklists” custom fields as
- [ON HOLD] item with Unchecked state
- [IN QA] item that is IN QA status with Unchecked state
+ [QA FAILED] item that has QA FAILED state Checked state
Example based on the previously viewed checklist: